Showing posts with label DIY. Show all posts

March 25, 2011

They're dropping like flies

We have a problem and I need your help to solve it.

These are our front porch steps. Yes, they are covered in gross pollen but thats the least of my worries.
See how the terra cotta tile is not everywhere? It once was. I am sure it was beautiful back in 1954 when our house was built. Leaving grouted tile exposed to the elements for 50+ years in a spot that doesn't get much sun = drainage issues =
One by one, they are dropping like flies. Right after we moved in we lost one, then another, then another. I save the whole tiles thinking once the weather warmed up I could use some heavy duty outdoor adhesive and fix it right up.
But now, piles like this one show up on a regular basis.

What to do? I love the tiled look, I would even do it again if I could find the exact same tiles...
because they are on the landing of our covered front porch. Those tiles are in great shape. Just covered in gross pollen at the moment.
So, as I see it, here are my options. Paint or re-tile the whole dang thing (landing and all). I am pretty sure I won't be able to find the exact same tile and I know mismatched tile will probably look worse than what it looks like right now.

Painting without ripping out the tile on the landing is what I am leaning towards. It's quick, cheap and durable. Worst case scenario, I can tile over it. Should I go grey? red? black? taupe? pink? neon yellow?

Here's a picture of the front of the house for inspiration. (Taken back when the front porch had all of it's tiles.... )
HALP!

March 9, 2011

Dreading, Dreading...

Up next, my most favorite thing to do ever. Painting Trim... wah, wah, waaaahhhh....

Here's the rub: Before we bought our house back in 2009 (wow, can't believe it's been that long), the previous owners had the trim painted. I understand why because the old trim color was a greenish-off-white. GROSS. See this picture, where paint is chipping... the color underneath was the trim color. Again, EWWW.
BUT... The painters (whether just dumb or lazy) painted with latex paint over the older oil based paint. PAINTING FOUL!!! I take it back, I mean, it can be done but only if - as the guy at Sherwin Williams told me - the old wall/trim is clean, dull and dry. That didn't happen in our house and this is what happens.
Not really attractive is it? In some spots they really didn't even finish the job...
Now you see why I am dreading this project. The painters however were nice enough to leave an empty trim paint bucket and it was labeled with the paint color... HALLELUJAH! I had picked up a chip of the color back when we bought the house... the trim was already chipping way back then.

I just had to find it...
The color used is Pure White from Sherwin Williams SW7005. (right above the color that is starred)
and today is the day. I picked up a gallon of latex trim paint from Sherwin yesterday. I know, you're saying, "But, you just said, the problem was the latex paint." You are right, I had a lengthy discussion with the paint guy about the best way to proceed. Here were my two options:

1. sand extensively all the trim in the house (approximately 2,876,858,865 miles of baseboard, chair railing, doors, crown, windows, etc). Clean all the dust. Prime with oil based primer and then paint with oil based semi gloss.

2. Lightly sand the trouble spots, clean all trim really well. Paint with latex semi gloss paint.

DUH, I went with #2.

If you need me, I will be on a ladder with my hand cramped in a claw around my paint brush. SAVE ME!!!

February 21, 2011

How To: Make your own seed pots

This was the big weekend. No, not the big President's Day Sale weekend. Rather, the "Make 150 seed pots out of newspaper weekend!"

I mentioned that I was going to attempt to make my own seed pots this year to save a bucket-load of money by starting my garden from seed. Starting from seed saves a considerable amount of money. See, you can buy one plant for $2-$4 or you can buy a pack of 150 seeds for $2-$4. DUH! No brainer. This method however can really bite you in the tush if you buy all the pre-made seed pots marketed at the big box chain. I decided to stick it to the man and make my own.
Here's how to do it: Start with newspaper, tape, scissors and an aluminum can/tin can/anything round and sturdy.
I cut the newspaper (keeping it folded in half) about 8" from the edge (the one you turn the page from). Then another cut approximately 8" from the first cut. You will be left with a skinny piece that was the original binding fold of the paper which you can recycle. Open up your strips so they are easy to work with.
Start rolling your strips around the can. You want it to be snug but not so tight that you can't get it off the can once you've made your pot.
Keep rolling and secure the end of the strip with a piece of tape.
Flip the can and position the paper rolled around the can about 1-1.5" from bottom of the can. At this point pretend this is a gift you are wrapping. You want enough overhang to fold a secure bottom but not so much that the base is bulky.
Fold the end down in 3-4 sections, making sure to cover the base completely. You don't want a hole in the bottom of your seed pot for the dirt to fall out of.
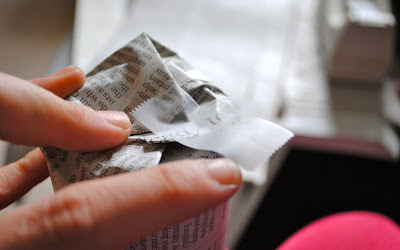
Secure this last step with a piece of tape and slip the seed pot off the can.
The pot is pretty sturdy and holds it's shape well. Good work!
Now, go make another 150 of them. Are you done yet?

I am using "under-the-bed" storage containers to simulate a little greenhouse and keep the seed pots corralled. Something like this should do the trick.
I estimate I saved about $50 by making them myself. Eric saved the day and helped and the project only took us about an hour. Not too shabby. I like "paying" myself $50 an hour.

*Note - these seed pots are NOT plantable. When it is time to transplant my seed pots to the garden, I will peel away the newspaper and discard. I decided to speed up the process in pot making by using scotch tape which is not biodegradable. If you want plantable seed pots, simply switch the tape out for a flour and water paste - oh and use the black and white pages only!

PS - This post is included in The Lettered Cottage's Spring How-To Linky Party - go check out all the other fun How-Tos!
The Lettered Cottage

January 23, 2011

DIY Plantable Seed Pots

I am officially over winter but, no where close to being ready for summer. Let's just stay spring all year long, ok? OK!

I got my big packet of seeds from Henry Fields really quick - and now I cannot wait to get those babies started... but I can't just yet.

A couple of key pieces of info are important for deciding when to set out plants. First, I need to know approximately when I want to set out my plants... aka, when can I actually dig the holes in the garden to plant the plants. A quick look at the 2011 Farmer's Almanac predicts the last frost for my area around April 1st - so I have to plant after that.
I know from planting a garden for the past couple of years that planting around Easter seems to work best for me - its still cool enough that my lettuce doesn't wilt in the summer heat but also warm enough that the tomatoes start going and I'll have some great fruit by early summer. Easter is April 24 this year so somewhere in between April 1 and April 24 will be best. A good hard and fast rule for planting is that you want the ground temperature to stay consistently over 50 degrees - even overnight.

Most of the seeds I ordered suggest starting them indoors 6 to 8 weeks before planting. Starting them indoors where its warmer and they still get sun or artificially get light through grow lights (yes, think Weeds season 4) is ideal. Working backwards from April 16th, my targeted plant date, I determined that I would start seedlings on February 19th.

So between now and Feb. 19th I really need to get on prepping the new homes that the seedlings will be growing in until they are ready to go live in the garden. I've used seed pods and seedling trays before but, this year, since I am cheap and also plan on growing A LOT of seedlings to give away and really have a prolific garden - again because I am cheap - I needed this to be a DIY project. There are several great options out there including recyling toilet paper or paper towel rolls cut in half but I am going with the newspaper option.
WHY you ask? While the toilet paper roll option would be much quicker and less work, I just don't think there is anyway I can save up oh about 100 tubes in the next month. We just don't go that much. sorry.
The DIY seed pots made of newspaper seem to be really easy - basically you take a strip of newspaper (black ink only) and make a little "cup" - using a flour and water paste to seal the deal. This seed pot can be planted right in your garden or easily peeled off when planting.

Eric and I are going to have a little seedling pot making party soon - we need to churn out about 100 of these babies over the next month. I'll be sure to let you know if I plan on ever doing this project again afterward. Has anyone else done this?


*photos from Farmers Almanac, Re-Nest and Chicago Tribune - links in text

January 5, 2011

Splendid Minta Annual Report: House Projects

It's that time again.

Time to revel in 2010's accomplishments and I think it's safe to say, our house has come a long way baby.
without further ado, 2010's DIY projects:
a) installed a medicine cabinet in the master bath; b) the front yard got a haircut; c) painted the paneling and trim in the den; d) up-cycled 5 thrift store lamps

a) refurbished a set of vintage bouncy patio chairs; b) removed the pergola-thingy blocking the den windows; c) painted our wrought-iron fence; d) built our spindle-leg farm table

a) removed lovely floral wallpaper in our master bath and installed a new light; b) ripped out the old closet and installed a more efficient system in our master closet; c) painted the front door glossy black; d) turned the ugly 80's brass chandy into a showstopper

a) painted our found (in the attic!!) twin bed frames; b) painted the hallway a moody smokey grey; c) gave our kitchen a major face-lift with paint; d) pressure washed all our sidewalks, siding and patios - MAJOR GROSS!

a) built our own hutch/sideboard; b) chopped down the monster Lady Banks Rose bush; c) built a raised bed garden and had a bumper crop last summer; d) painted the dining room 3 times, yes, 3 times - this shows color #2 and color #3 is the cut in color - much better.

WOW.

We did a lot. In total we probably spent about $600 on all the projects above - most of the cost being for lumber and paint. Lots and lots of paint. I cannot even begin to tell you the amount of man hours spent. I am overwhelmed thinking about it all.

Looking forward to 2011 - the house projects will be scaled back a bit while I am in school but I do want to accomplish the following:
- painting the moulding in the ENTIRE HOUSE, all the same color of course
- giving the pink bathroom a free (or mostly free facelift)
- possibly moving the laundry facilities from the kitchen to the soon-to-be mudroom/laundry/craft room.
- stripping and re-caulking & painting the windows on the outside of the house.

The Dewey Decimal system of links

Let's get real here, I spend a fair amount of time "Rogging". What is Rogging you say? It's Liz-speak for blog reading. Is there an actual word out there for this act? I visit crafty sites, home improvement ones, a few fashion and cooking blogs too. Most days I find a few projects/recipes/ideas that I want to file away for later use and these typically get dragged to a bookmark titled CRAFTY LINKS on my firefox browser window.

NO MORE... In an effort to be more efficient, use the blog for more purposes other than pretty pictures and little notes on life, I've created the Splendid Minta Link Library. Here you can find some of my favorite craft projects I have yet to try, yummy recipes, some cool DIY projects and just general links I don't want to lose. Go see if there is anything you like too...

December 22, 2010

Inspiration Dumping Ground: Bathrooms

Next up in the Inspirational Virtual dumping post: Bathrooms!!!

Grab a book and some bubble bath and sink (get it, sink) into these great bathrooms.
It's the clawfoot tubs. They get me every single time.

photos from Martha Stewart, Sarah Richardson, Elle Decor, Country Living and all around the web.
Related Posts Plugin for WordPress, Blogger...