Showing posts with label garden. Show all posts

May 17, 2011

First Veggie Porn of 2011

The garden is going strong! Allow me to expose the first veggies of the season... PEAS!
These little guys were so sweet and buttery I ate most of them as I was shelling them but a few made it onto a hodge-podge salad.
I did however turn to Eric halfway through shelling and said, "Man, you would need a whole field of plants to actually make enough to do anything with".

Which is why, although I enjoyed my first pea growing experience this year, it was not worth it. I will continue to buy my $.99 bag of frozen peas. thankyouverymuch.

March 25, 2011

They're dropping like flies

We have a problem and I need your help to solve it.

These are our front porch steps. Yes, they are covered in gross pollen but thats the least of my worries.
See how the terra cotta tile is not everywhere? It once was. I am sure it was beautiful back in 1954 when our house was built. Leaving grouted tile exposed to the elements for 50+ years in a spot that doesn't get much sun = drainage issues =
One by one, they are dropping like flies. Right after we moved in we lost one, then another, then another. I save the whole tiles thinking once the weather warmed up I could use some heavy duty outdoor adhesive and fix it right up.
But now, piles like this one show up on a regular basis.

What to do? I love the tiled look, I would even do it again if I could find the exact same tiles...
because they are on the landing of our covered front porch. Those tiles are in great shape. Just covered in gross pollen at the moment.
So, as I see it, here are my options. Paint or re-tile the whole dang thing (landing and all). I am pretty sure I won't be able to find the exact same tile and I know mismatched tile will probably look worse than what it looks like right now.

Painting without ripping out the tile on the landing is what I am leaning towards. It's quick, cheap and durable. Worst case scenario, I can tile over it. Should I go grey? red? black? taupe? pink? neon yellow?

Here's a picture of the front of the house for inspiration. (Taken back when the front porch had all of it's tiles.... )
HALP!

February 21, 2011

How To: Make your own seed pots

This was the big weekend. No, not the big President's Day Sale weekend. Rather, the "Make 150 seed pots out of newspaper weekend!"

I mentioned that I was going to attempt to make my own seed pots this year to save a bucket-load of money by starting my garden from seed. Starting from seed saves a considerable amount of money. See, you can buy one plant for $2-$4 or you can buy a pack of 150 seeds for $2-$4. DUH! No brainer. This method however can really bite you in the tush if you buy all the pre-made seed pots marketed at the big box chain. I decided to stick it to the man and make my own.
Here's how to do it: Start with newspaper, tape, scissors and an aluminum can/tin can/anything round and sturdy.
I cut the newspaper (keeping it folded in half) about 8" from the edge (the one you turn the page from). Then another cut approximately 8" from the first cut. You will be left with a skinny piece that was the original binding fold of the paper which you can recycle. Open up your strips so they are easy to work with.
Start rolling your strips around the can. You want it to be snug but not so tight that you can't get it off the can once you've made your pot.
Keep rolling and secure the end of the strip with a piece of tape.
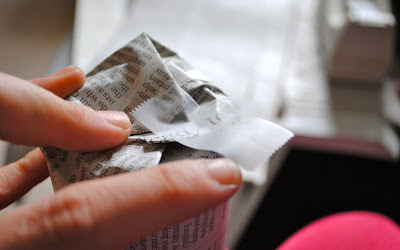
Flip the can and position the paper rolled around the can about 1-1.5" from bottom of the can. At this point pretend this is a gift you are wrapping. You want enough overhang to fold a secure bottom but not so much that the base is bulky.
Fold the end down in 3-4 sections, making sure to cover the base completely. You don't want a hole in the bottom of your seed pot for the dirt to fall out of.
Secure this last step with a piece of tape and slip the seed pot off the can.
The pot is pretty sturdy and holds it's shape well. Good work!
Now, go make another 150 of them. Are you done yet?

I am using "under-the-bed" storage containers to simulate a little greenhouse and keep the seed pots corralled. Something like this should do the trick.
I estimate I saved about $50 by making them myself. Eric saved the day and helped and the project only took us about an hour. Not too shabby. I like "paying" myself $50 an hour.

*Note - these seed pots are NOT plantable. When it is time to transplant my seed pots to the garden, I will peel away the newspaper and discard. I decided to speed up the process in pot making by using scotch tape which is not biodegradable. If you want plantable seed pots, simply switch the tape out for a flour and water paste - oh and use the black and white pages only!

PS - This post is included in The Lettered Cottage's Spring How-To Linky Party - go check out all the other fun How-Tos!
The Lettered Cottage

February 20, 2011

This is very promising

Do you see what I see? Look closely!
You see it? That is my favorite hydrangea and it's new baby buds!
And this one? My sedum is already going gangbusters!

On tap today... 1. Finish the paper seed pots for starting my garden from seeds. 2. Build our second raised bed (hubby is at Lowes as we speak picking up the cedar boards). 3. Sow seeds (YES!!!).

Is spring peaking it's little green head out where you are? I hope so!

January 23, 2011

DIY Plantable Seed Pots

I am officially over winter but, no where close to being ready for summer. Let's just stay spring all year long, ok? OK!

I got my big packet of seeds from Henry Fields really quick - and now I cannot wait to get those babies started... but I can't just yet.

A couple of key pieces of info are important for deciding when to set out plants. First, I need to know approximately when I want to set out my plants... aka, when can I actually dig the holes in the garden to plant the plants. A quick look at the 2011 Farmer's Almanac predicts the last frost for my area around April 1st - so I have to plant after that.
I know from planting a garden for the past couple of years that planting around Easter seems to work best for me - its still cool enough that my lettuce doesn't wilt in the summer heat but also warm enough that the tomatoes start going and I'll have some great fruit by early summer. Easter is April 24 this year so somewhere in between April 1 and April 24 will be best. A good hard and fast rule for planting is that you want the ground temperature to stay consistently over 50 degrees - even overnight.

Most of the seeds I ordered suggest starting them indoors 6 to 8 weeks before planting. Starting them indoors where its warmer and they still get sun or artificially get light through grow lights (yes, think Weeds season 4) is ideal. Working backwards from April 16th, my targeted plant date, I determined that I would start seedlings on February 19th.

So between now and Feb. 19th I really need to get on prepping the new homes that the seedlings will be growing in until they are ready to go live in the garden. I've used seed pods and seedling trays before but, this year, since I am cheap and also plan on growing A LOT of seedlings to give away and really have a prolific garden - again because I am cheap - I needed this to be a DIY project. There are several great options out there including recyling toilet paper or paper towel rolls cut in half but I am going with the newspaper option.
WHY you ask? While the toilet paper roll option would be much quicker and less work, I just don't think there is anyway I can save up oh about 100 tubes in the next month. We just don't go that much. sorry.
The DIY seed pots made of newspaper seem to be really easy - basically you take a strip of newspaper (black ink only) and make a little "cup" - using a flour and water paste to seal the deal. This seed pot can be planted right in your garden or easily peeled off when planting.

Eric and I are going to have a little seedling pot making party soon - we need to churn out about 100 of these babies over the next month. I'll be sure to let you know if I plan on ever doing this project again afterward. Has anyone else done this?


*photos from Farmers Almanac, Re-Nest and Chicago Tribune - links in text

January 7, 2011

the early bird...

...gets the seeds on sale.
Even though it's only 42 degrees here in the drrrrty south, I am looking forward to spring - mostly looking forward to my garden and the bounty of veggies I plan on raising this year.

My annual Henry Fields catalog came in the mail a week or so ago and that great coupon for $50 worth of seeds for $25 just could not be passed up.
trying to fill your cart with $50 worth of seeds is kind of hard.

I managed though. You should never worry about a girl having a hard time filling her shopping cart.

Here are some of my favorites:
And for the full list: cucumbers (slicing & pickling), dill, basil, cilantro, lettuce blend, buttercrunch lettuce, green onions, bell peppers (red & yellow), yellow squash, zucchini, cherry tomatoes, slicing tomatoes, eggplant, and sugar snap peas

Buying $50 worth of seeds means I will have something like 2500 seeds to actually germinate, thin and plant. This may have been a mistake.

*please do not quote me on this but I think a coupon code is on every catalog or order on the website. The offer is good through February 18, 2011.
Related Posts Plugin for WordPress, Blogger...