This was the big weekend. No, not the big President's Day Sale weekend. Rather, the "Make 150 seed pots out of newspaper weekend!"
I mentioned that I was going to attempt to make my own seed pots this year to save a bucket-load of money by starting my garden from seed. Starting from seed saves a considerable amount of money. See, you can buy one plant for $2-$4 or you can buy a pack of 150 seeds for $2-$4. DUH! No brainer. This method however can really bite you in the tush if you buy all the pre-made seed pots marketed at the big box chain. I decided to stick it to the man and make my own.

Here's how to do it: Start with newspaper, tape, scissors and an aluminum can/tin can/anything round and sturdy.
 I cut the newspaper (keeping it folded in half) about 8" from the edge (the one you turn the page from). Then another cut approximately 8" from the first cut. You will be left with a skinny piece that was the original binding fold of the paper which you can recycle. Open up your strips so they are easy to work with.
Start rolling your strips around the can. You want it to be snug but not so tight that you can't get it off the can once you've made your pot.

Keep rolling and secure the end of the strip with a piece of tape.

Flip the can and position the paper rolled around the can about 1-1.5" from bottom of the can. At this point pretend this is a gift you are wrapping. You want enough overhang to fold a secure bottom but not so much that the base is bulky.

Fold the end down in 3-4 sections, making sure to cover the base completely. You don't want a hole in the bottom of your seed pot for the dirt to fall out of.
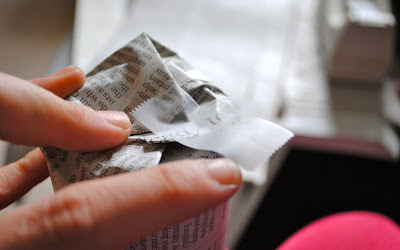
Secure this last step with a piece of tape and slip the seed pot off the can.

The pot is pretty sturdy and holds it's shape well. Good work!
Now, go make another 150 of them. Are you done yet?I am using "under-the-bed" storage containers to simulate a little greenhouse and keep the seed pots corralled. Something like this should do the trick.


I estimate I saved about $50 by making them myself. Eric saved the day and helped and the project only took us about an hour. Not too shabby. I like "paying" myself $50 an hour.
*Note - these seed pots are NOT plantable. When it is time to transplant my seed pots to the garden, I will peel away the newspaper and discard. I decided to speed up the process in pot making by using scotch tape which is not biodegradable. If you want plantable seed pots, simply switch the tape out for a flour and water paste - oh and use the black and white pages only!
PS - This post is included in The Lettered Cottage's Spring How-To Linky Party - go check out all the other fun How-Tos!
This is so great, I'm glad I found your post. We're starting a huge garden this year and spending lots of $$ on potted plants just won't cut it. How soon do you plan on starting your seeds? We're in IL, so I'm guessing I'll still have to wait a month or so.
ReplyDeleteGood luck to your seedlings!
Ann Marie - Thanks for your sweet comment! I am so glad you found it too, plants can be so expensive. I plan on setting out my plants around around mid-late March (but I am in Zone 9 - much warmer than IL) so I start my seeds indoors 6-8 wks before that. You'll need to check with the garden center or even do a bit of googling or check with the Farmer's Almanac for the best date to plant for each crop you plan to grow.
ReplyDeleteI just checked my Farmer's Almanac for you and it says Chicago area can expect the last frost around April 20 and the Springfield area will be around April 13th this year. You'll want to set your plants out (as in dig the hole and actually plant) after that date or be prepared to cover them if you get a frost. Good luck!
WE made a few of these. Just to try them out. We also made some with TP rolls- and added egg shell centers...
ReplyDeleteso far the newspaper is holding better than the TP rolls.. I may have to make some more, I'm afraid some of the seed washed away from the TP and egg shells. The newspaper is definitely the way to go in my experience.
good luck with yours!
Hi Liz. I found you over at How To's Day and I'm loving your blog. I'm your newest follower! Great job!!! Rebecca
ReplyDeleteLove this! You guys are too smart! :)
ReplyDeleteWhat a great idea. I love that you found a way to repurpose something and save money. Plus, I think the little pots are super cute.
ReplyDeleteThanks so much for your help and for looking that up! I'm going to feature this on our blog's facebook page. :)
ReplyDeleteMy children and I are going to plant this year as well. The seed pots or pre-grown plants start racking up fast! We are going to end up using some of the old small jelly jars or empty jars from around the house, and hang them. The kids loved the idea, this way they can watch them grow!
ReplyDelete