February 28, 2011

the best i can do today

- today's theme song, the one I started singing as I got dressed this am: "La Vie Boheme"
- Why? because I threw on jeans - french cuffed, a tank top, a long cardi, a pashmina, the first necklace I saw, my glasses and then a gladiator kinda headband over my top knot hairdo. It's a crazy day and please believe me when I say I would fit right in at the long table in Rent with this outfit.
- in the library since 7am... homework and midterm tests to do
- must get eyebrows waxed asap (don't look at them)

Spring Break is next week and today's outfit just reflects that fact that I need a little break. I love school, do not get me wrong, but my brain needs to take a nap for about a week. Being on the beach would be better but honestly, I am just excited to do a few DIY home improvement type things. I've got three projects I want to tackle that week and all come in under $100 total. I will be sure to share. Yea, you betcha.

February 25, 2011

Identity crisis

Splendid Minta is going through an identity crisis. I know I don't love what I've got going on. So I've spent all morning on Picnik trying to right the wrong.
HALP!

Etsy Strolling: The Wheatfield

I found this pretty little shop on Etsy. Allow me to introduce you to the wheatfield.

The paintings turned into prints and cards that are just the right amount of whimsey and charm. My favorite is the ampersand and the state series. She is working her way through all the states. I can't wait to see what South Carolina will look like!


*not a sponsored post, just lovely items I wanted to share.

February 24, 2011

This wall needs work!

The wall over our couch in the living room needs work.
Sorry for the old pic but you get the idea. I've got a great gallery wall started with some of my art, some friend's pieces (holla Hawley!) and a couple garage sale steals. But lets get real. It's pretty boring.

Spring yard sale goal: find some fun things to hang on the wall. Be it antlers, empty frames, plates, more art, or little chotskys - I've gotta beef this thing up! Here's some inspiration...
*all images found from Pinterest. Go and love it.

February 22, 2011

Whole lotta shakin' goin on

There's been a little "movin' and shakin'" in the furniture department around here lately.
A shiny new (to us) piece came to live with us recently. Can you guess what it might be?

February 21, 2011

How To: Make your own seed pots

This was the big weekend. No, not the big President's Day Sale weekend. Rather, the "Make 150 seed pots out of newspaper weekend!"

I mentioned that I was going to attempt to make my own seed pots this year to save a bucket-load of money by starting my garden from seed. Starting from seed saves a considerable amount of money. See, you can buy one plant for $2-$4 or you can buy a pack of 150 seeds for $2-$4. DUH! No brainer. This method however can really bite you in the tush if you buy all the pre-made seed pots marketed at the big box chain. I decided to stick it to the man and make my own.
Here's how to do it: Start with newspaper, tape, scissors and an aluminum can/tin can/anything round and sturdy.
I cut the newspaper (keeping it folded in half) about 8" from the edge (the one you turn the page from). Then another cut approximately 8" from the first cut. You will be left with a skinny piece that was the original binding fold of the paper which you can recycle. Open up your strips so they are easy to work with.
Start rolling your strips around the can. You want it to be snug but not so tight that you can't get it off the can once you've made your pot.
Keep rolling and secure the end of the strip with a piece of tape.
Flip the can and position the paper rolled around the can about 1-1.5" from bottom of the can. At this point pretend this is a gift you are wrapping. You want enough overhang to fold a secure bottom but not so much that the base is bulky.
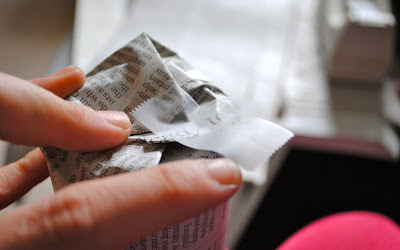
Fold the end down in 3-4 sections, making sure to cover the base completely. You don't want a hole in the bottom of your seed pot for the dirt to fall out of.
Secure this last step with a piece of tape and slip the seed pot off the can.
The pot is pretty sturdy and holds it's shape well. Good work!
Now, go make another 150 of them. Are you done yet?

I am using "under-the-bed" storage containers to simulate a little greenhouse and keep the seed pots corralled. Something like this should do the trick.
I estimate I saved about $50 by making them myself. Eric saved the day and helped and the project only took us about an hour. Not too shabby. I like "paying" myself $50 an hour.

*Note - these seed pots are NOT plantable. When it is time to transplant my seed pots to the garden, I will peel away the newspaper and discard. I decided to speed up the process in pot making by using scotch tape which is not biodegradable. If you want plantable seed pots, simply switch the tape out for a flour and water paste - oh and use the black and white pages only!

PS - This post is included in The Lettered Cottage's Spring How-To Linky Party - go check out all the other fun How-Tos!
The Lettered Cottage

A shift is in the air.

I am feeling myself more and more drawn to mid-century/glamourous/retro/hollywood regency pieces lately. Take this little nugget for example. Gorg!

It's the Dauphine Armoire from SHINE SHO - there is no price listed so I am assume major bukoo buckerroos. BUT I think it could be a fun DIY project. I just love the gold touches.

February 20, 2011

This is very promising

Do you see what I see? Look closely!
You see it? That is my favorite hydrangea and it's new baby buds!
And this one? My sedum is already going gangbusters!

On tap today... 1. Finish the paper seed pots for starting my garden from seeds. 2. Build our second raised bed (hubby is at Lowes as we speak picking up the cedar boards). 3. Sow seeds (YES!!!).

Is spring peaking it's little green head out where you are? I hope so!

February 18, 2011

February 17, 2011

Inspiration Dumping Ground: Bedroom Ideas

A little mid week bedroom inspiration for your enjoyment.


Don't say I never do anything for you. xo

February 13, 2011

A very Picasso Valentine

Happy Valentines Day.

This is my valentine to my sweet husband of two and a half years.
It should be noted that I drew this in class after looking at slides of Picasso's children artwork phase. Oh how I love my Theory of Children's Art class. Do you think I was influenced? Yeah, me too.

Speaking of, I should be writing my midterm paper right about now.

I'll tell you a secret.

Since no one could figure out who this guy is... I'll tell you a secret. He's Frank Warren - the guy behind Post Secret. Have you heard of Post Secret?

Frank started this "art project" by asking random strangers to send anonymous postcards containing their secrets to his house in Maryland. Fast forward a few years and now he has received millions and millions of secrets. They range from sad to funny and everywhere in between. Every Sunday Frank uploads a selection of new secrets to his blog but, if you really want to see a bulk of the secrets, check out the books. He has compiled five (I think) books with some of the most intriguing ones.

Now, Frank travels around the world with "Post Secret Live" sharing the story behind the project and his reflections on the cathartic action of sending in secrets.
Eric and I have a ritual of checking the blog every Sunday morning together. We've been doing it for years, even over the phone when we were dating long distance. We even have a couple of the books.
and Frank (we're on a first name basis now) signed them for us.
PS - even shared which secret in the book was his. It's this one:
Related Posts Plugin for WordPress, Blogger...